
How to Customize Embossed Logos on Custom Luxury Tin Cans: High-End Product Packaging
For some high-end luxury brands, packaging is more than just a container—it is the first step in connecting with customers. Custom luxury tin cans inherently represent quality; 92% of luxury consumers associate tin cans with “high-end,” compared to only 58% for plastic cans. Adding an embossed logo, especially a 3D relief, further reinforces this perception: it is uniquely tactile, memorable, and impossible to ignore. Unlike potentially flat or cheap printed logos, embossed designs create a 3D texture, engaging multiple senses—sight and touch—to deeply imprint your brand in consumers’ minds. The key to a successful embossed logo is not just “making it stand out,” but also perfectly aligning the design with your brand, product, and target audience. We will analyze every step of customizing tin cans in detail, showing you exactly how to transform your logo into an embossed element to elevate the status of your tin cans.
Custom Luxury Tin Cans: What is an Embossed Logo?
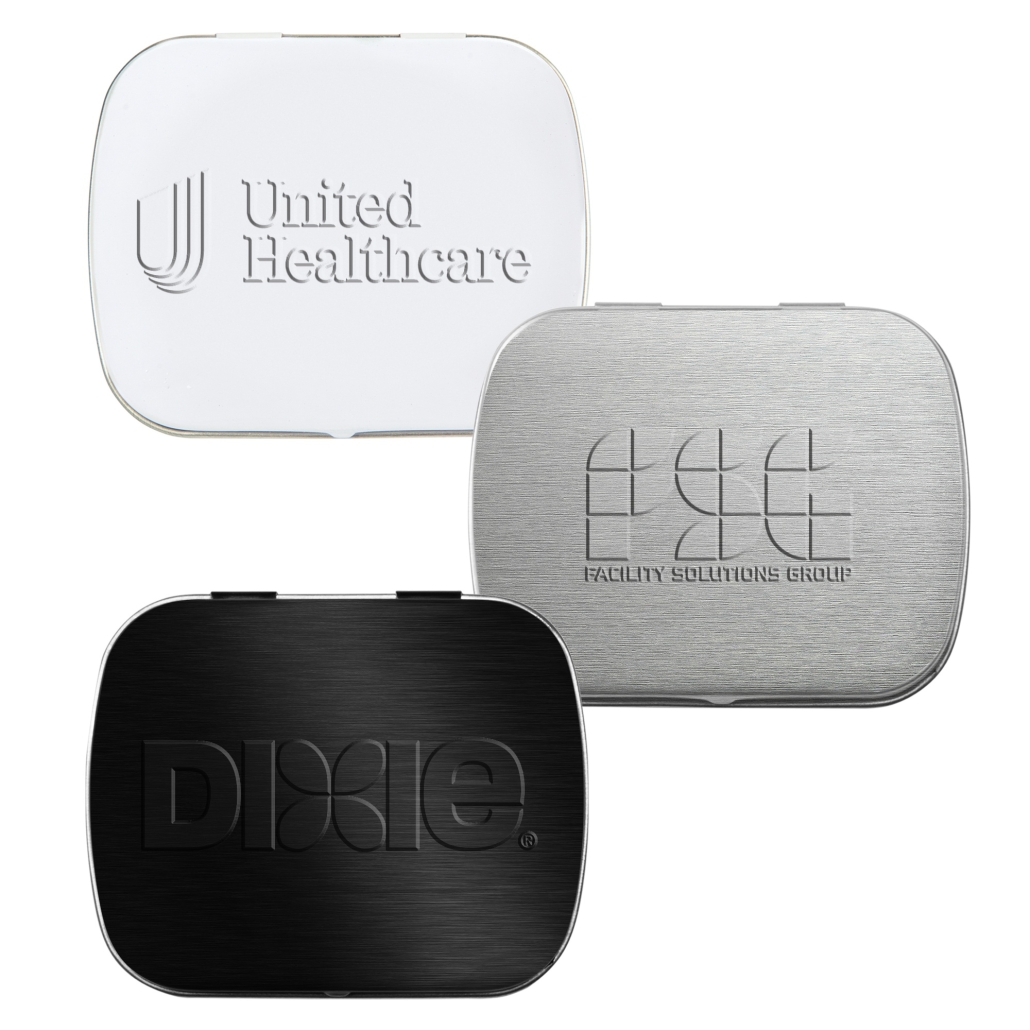
Embossed logos on custom tin cans refer to the process of using a precision mold to press a raised (3D) pattern onto the front of the tin can from the back. It is often confused with intaglio printing (which creates a recessed pattern from the front), but embossing is the gold standard of luxury—because the raised pattern reflects light, stands out on the shelf, and attracts touch.
For custom luxury tin cans, this means the embossed branding not only looks high-end but also feels it. A customer holding a can of premium tea with an embossed brand logo will associate that texture with the tea’s quality. The embossing process also gives the logo a durability that printed logos cannot match. Screen-printed or hot-stamped logos will wear down over time, especially if the tin can is reused. Embossed logos are an integral part of the tin can itself; they will not fade, scratch, or peel, ensuring your brand logo remains clearly visible for years to come.
![]()
Five Key Elements for Custom Luxury Tin Cans Embossed Logos
Creating an embossed logo for a custom luxury tin can hinges on five key choices. Each choice directly impacts the logo’s look, feel, and performance; therefore, we guide each client through the entire process during the initial consultation.
1. Embossing Depth: Balancing Visibility and Tin Can Integrity
Embossing depth ranges from 0.8 mm to 1.8 mm. For most logos, 1.2 mm is ideal—clearly visible without deforming the tin can. More striking, minimalist logos can utilize a depth of 1.5 mm for enhanced visual impact. For complex designs, the embossing depth should be maintained between 0.8 mm and 1.0 mm to avoid obscuring details.
2. Standard Sizes and Complexity
Embossing is best suited for logos with clean, prominent lines. Text that is too small or overly complex details will become blurred after embossing. We recommend simplifying the design. For example, when we customized gift tins for a restaurant, we simplified their complex logo to a single-letter structure and embossed it alongside a clean brand name. The final result was a logo that was clearly visible from 3 feet away and had a smooth feel. Generally speaking, if your logo looks good at 1-inch square, then it is also suitable for embossing.
3. Can Material and Surface Finish: Enhancing the Embossing Effect
A matte finish makes embossed branding even more visible, as the raised texture creates subtle light-and-shadow effects. A glossy finish works just as well, but we recommend adding some texture to the can surface first to enhance the embossing effect. For metal cans, embossing creates a beautiful contrast.
Tsing Embossing Process – From Sketch to Finished Product
At Tsing, we continuously refine our embossing process to ensure consistent quality and results. Our production process is broken down into five transparent steps, giving you a clear understanding of the workflow and timeline for each.
Step 1: Design Consultation
We will first review your logo files and discuss your goals: do you want a striking or subtle embossed effect? Will the tin cans be reused? What is your product category? Afterwards, we will provide 2-3 concept sketches showcasing the logo’s placement and depth, and use 3D renderings to give you a visual understanding of the final effect.
Step 2: Mold Making
Once you confirm the design, we will create a custom steel mold for your exclusive logo. This mold uses precision cutting to ensure a perfect match to your logo’s size and depth—we use CNC machine tools to ensure every edge is sharp and clean. Unlike some manufacturers who use plastic molds, our steel molds are reusable—if you later order custom high-end tin cans again, we can use the same mold, saving you time and money.
Step 3: Prototype Testing
We will create 2-5 physical prototypes using your chosen tinplate material and surface treatment. This step is crucial—you can feel the embossing’s depth, check for any blurring, and ensure the logo aligns with your brand image. For example, a high-end jam brand found the embossing was too deep during prototype testing, so we adjusted the mold to 1.0 mm.
Step 4: Production
We use automated embossing machines to imprint the design onto each jar. Our machines apply consistent pressure to ensure an apparent embossed effect on every jar. For large orders (over 10,000 tins), we conduct a random quality check every 500 jars to check the embossing depth, alignment, and jar integrity. We also process any matching surface treatments (hot stamping, texture) at this stage to ensure a perfect blend between the embossing and the surface treatment.
Step 5: Quality Control and Shipping
Each jar undergoes a final inspection: we check for even embossing, warped edges, or other surface defects. Then, we pack the jars in protective boxes and ship them directly to your warehouse or logistics center. We provide tracking information and assign a dedicated account manager to follow up, ensuring your satisfaction with the final product.
Embossed Logos: A Perfect Match for Your Product Category
Embossed logos should not be generic; they should align with your product, your target audience, and how the tin can is used. Here are our tailored recommendations for the most common product categories, based on thousands of success stories:
Luxury skincare brands (serums, moisturizers, masks) often use custom luxury tin cans to convey a “natural” and “premium” image. We recommend an embossing depth of 0.8–1.0 mm, with the logo placed on the lid or front. Matte white or soft pink tins work best, and the embossed logo uses a similar color scheme for a clean and simple visual effect.
Gourmet products (chocolate, nuts, coffee) need eye-catching embossed logos to stand out on supermarket shelves. We recommend an embossing depth of 1.2–1.5 mm, with bold lettering and a simple design. We once collaborated with a chocolate truffle brand that used a 1.5 mm-thick truffle-pattern embossed logo on rectangular metal cans. Metallic metal cans (gold, copper) pair well with food brands, as they evoke a sense of “purchase.”
Scented candle brands rely on the reuse of custom luxury tin cans, so the embossed logo must remain clearly visible even after the candle has burned out. A depth of 1.2mm works best, allowing the brand logo to be printed on the lid or side. We recommend adding a small “Reuse Me” embossing next to the brand logo to encourage customers to keep the can, thereby expanding the brand’s reach.
Avoiding the Most Common Embossing Mistakes
Even with good intentions, brands sometimes make mistakes that result in poor embossing on custom high-end tin cans. These problems are avoidable—based on 20 years of experience, we have summarized the most common mistakes (and their solutions):
Mistake 1: Using a Low-Resolution Logo File
A blurry logo will result in a blurry embossing. Please provide a vector file (AI or EPS) or a high-resolution PNG. If you do not have a vector file, our design team can redraw the logo for a small fee—ensuring sharp, clean edges.
Mistake 2: Logo Size Too Small
Logos smaller than 1×1 inches often lose detail when embossed. We recommend that most custom tin can logos be at least 1.5 x 1.5 inches. If you need a smaller logo, consider a monogram or icon.
Mistake 3: Overly Complex Design
Logos with delicate lines, gradients, or multiple colors are not suitable for embossing. Stick to solid shapes and bold lines. A winery’s logo featured a gradient sunset, and they requested an embossed version; we simplified it to a solid sun icon and their brand name, resulting in a more sophisticated look than the original.
Mistake 4: Choosing the Wrong Tin Can Thickness
Thin tin cans (0.20 mm or less) cannot support embossed details—the can will warp or the design will fade over time. Always use 0.30–0.35 mm thick tin cans for embossing. A budget-conscious brand once requested 0.25mm-thick tin cans to save costs; we tested a prototype and showed them how the embossing would blur after a few months—they ultimately opted for 0.30mm-thick tin cans, which turned out flawlessly.
Mistake 5: Logo Does not Match the Tin Can Shape
Cylindrical tin cans need a curved logo to look straight; rectangular tin cans require a centered logo design. Our 3D renderings can help, but it is crucial to print the logo directly on the tin can.
Creating Unforgettable Custom Tin Cans
Custom tin cans are a powerful tool for luxury brands, and embossed logos make them truly memorable. They engage the consumer’s senses, convey a message of quality, and maintain brand recall long after product use. At Tsing, we do more than emboss logos; we are committed to creating an experience. From the initial design consultation to the final tin can delivery to your warehouse, we are there for you, ensuring your embossed logo is precise, durable, and perfectly matches your brand.
 Facebook
 Twitter
 Linkedin
